Are you making any of these not-so-obvious Pinterest mistakes that are hurting your shares and engagement? Here’s how to find out and fix them.
Most bloggers that write about Pinterest marketing talk about the basics of using the platform, such as creating a Business account, using Rich Pins, and optimizing your profile and boards with keywords.
But, as an active and engaged Pinterest user, I see a number of not-so-obvious mistakes that Pinners are making all the time. Many of them can affect how your Pin is shared, and whether it gets clicks back to your website.
In this article, I outline some not-so-obvious Pinterest mistakes that are hurting your shares and engagement. Learn how to use Pinterest the right way and get advanced Pinterest tutorials and tools to grow your blog traffic.
#1. Using the wrong Alt text in your Pins
I see many Pinners using their image’s Alt text to generate their Pinterest description. But, the primary purpose of Alt text is to describe the photo to visually impaired users, so doing this can harm your website’s usability and search engine optimization (SEO).
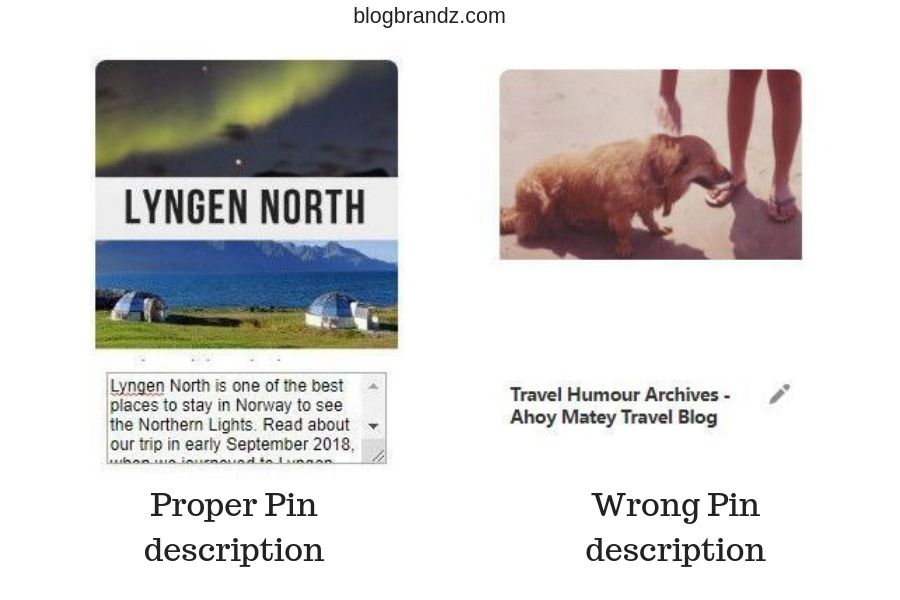
In addition, many Pinterest users have no idea how to optimize their Pins so that the correct description gets picked up by Pinterest’s share buttons. Here’s a comparison of how your description appears if you’ve optimized your Pins properly as opposed to not using the proper code.
The Pin on the left was hard-coded using the piece of code below. I save it in a text file and modify it for each Pin.
<img src=”THE IMAGE YOU WANT DISPLAYED ON YOUR BLOG” alt=”YOUR ALT TEXT GOES HERE” data-pin-media=”THE IMAGE YOU WANT SHARED ON PINTEREST” data-pin-description=”YOUR PINTEREST PIN DESCRIPTION, KEYWORDS AND HASHTAGS GO HERE” data-pin-url=”YOUR BLOG POST URL” data-pin-id=”YOUR PIN ID AFTER IT IS PINNED TO PINTEREST” />
Note: If you’re confused by what “YOUR PIN ID AFTER IT IS PINNED TO PINTEREST” means, it’s just the number I’ve highlighted in red below. This is your Pin ID that Pinterest assigns to your Pin AFTER you share the image on Pinterest.
https://in.pinterest.com/pin/447615650462612472/
Click here to see how the URL above looks on Pinterest.
You need to copy and paste this number into the code for your Pin, by going back and editing your blog post and then saving the post again.
That way, whenever someone shares this Pin from your blog post, they will end up sharing the Pin that you chose so this pin will get more shares and more chance of going viral on Pinterest.
The code above also helps me ensure that the correct description gets picked up by Pinterest. The image on the right shows how Pins that are not properly coded get picked up by Pinterest. Which one would you rather share?
You can either add the code above manually or automate the process of adding it with the WPTasty plugin for WordPress. This will help you prevent errors that creep in when doing this manually (which happens pretty often).
#2. Not writing a good Pin description
Pin descriptions can be up to 500 characters in length, but you don’t have to use up all of that space. According to the blog here, the most repinned and commented-on items have descriptions of 200 to 300 words.
Your Pinterest description should include the following:
- Mention the problem or pain point addressed in the blog post
- Tell the Pinterest user how your post solves their problem
- Add a call-to-action such as “Click here” or “Read More” to get the click
- Add a few relevant keywords and no more than 20 hashtags for optimization
DO NOT keyword stuff your descriptions. I see Pinterest users making this mistake all the time. If keyword stuffing didn’t work for Google SEO, it will cease to work on Pinterest too.
When that happens, can you go back and change the spammy descriptions on all your old pins? No, you can’t! Use SEO copywriting best practices to write Pinterest Pin descriptions that both users and Pinterest loves.
Here’s an example of what you can put in your Pin description according to the code above.
alt=”Pinterest Marketing Guide PDF – Learn How To Use Pinterest The Right Way”
data-pin-description=”If you’re a blogger or have an online business, you need Pinterest marketing. Download my Pinterest Marketing Guide PDF, a guide to getting started on Pinterest, and learn how to use Pinterest the right way. Get Pinterest Tips that even the Gurus are not teaching. Pinterest Tips | Pinterest Marketing | How To Use Pinterest | Pinterest Strategy #pinterest #marketing”
According to Pinterest, to pick keywords, think about who you want to see your Pin, and where you want it to appear. You can also start typing your topic into a Pinterest search to see recommended topics.
To find the right keywords to add to my description, I use the Pinterest search feature so I can use the ones that Pinterest users are actually typing into the search bar, to find the most appropriate keywords for my content.
Pinterest keywords are not necessarily the same as the keywords that people type in on Google.
#3. Using the wrong aspect ratio in your images
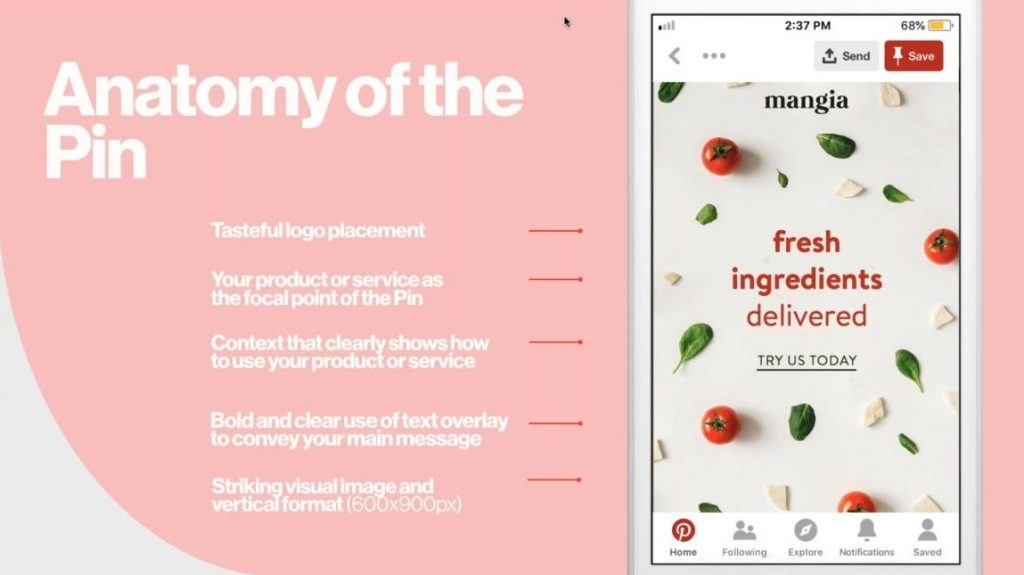
It bears repeating that Pinterest favors a 2:3 aspect ratio in your Pins and that the preferred Pin size is 600 x 900 pixels. Still, I see Pinterest users Pinning square and horizontal Pins all the time.
If you want your Pins to be displayed properly on mobile devices (which is where 80% of all Pinterest searches happen), you need to use Pinterest’s recommended aspect ratio for your Pins.
This is the ideal anatomy of a Pin, according to Pinterest.

#4. Not creating multiple Pins for the same post
I’ve been guilty of this mistake too. Sometimes it’s too much trouble to create another Pin for your post when you just spent 30 minutes creating the perfect one.
But creating more than one Pin not only gives you fresh content to Pin (every new Pin image is fresh content in Pinterest’s eyes), but also allows you to test which designs are doing better than others.
For example, I created these 3 Pins for one of my posts before I found that the one in the middle was performing best.
Arrgh! I hate when I click on a blog post that I need to share and have to search for the sharing buttons to share a post.
If you don’t have easily accessible sharing buttons on your blog, no one’s going to bother looking for them unless they have to.
I don’t understand why that isn’t obvious to other bloggers too, especially when it’s so easy to set up a floating share bar on your blog with free WordPress plugins like AddToAny.
Are you making any of these Pinterest mistakes on your blog? If so, I hope you found this list useful.
Want to take your Pinterest Marketing to the next level? Learn from the experts who get 100,000+ monthly visitors from Pinterest.
Pinterest Tips & Tools
- Free Pinterest Training And Pinterest Courses For Bloggers
- 7 Reasons Why New Bloggers Should Not Ignore Pinterest Search
- Why You Need A Pinterest Business Strategy And How To Create One
- Pinterest Traffic Avalanche Review: Why It’s The Top Pinterest Course Online
- Google SEO Vs Pinterest SEO For Bloggers: 7 Essential Differences
- 8 Pinterest Marketing Tips To Boost Engagement And Branding
© 2018 – 2023, Priya Florence Shah. All rights reserved.
Priya Florence Shah is a bestselling author and an award-winning blogger. Check out Devi2Diva, her book on emotional self-care for women. In her spare time, Priya writes science-fiction novels and poetry and chills with her two-legged and four-legged kids.
Discover more from Business & Branding Tips
Subscribe to get the latest posts to your email.


Hi,
I have read different articles on instagram and pinterest marketing advices but this is a really insightful article. Really enjoyed reading it, especially the points number 5 and 6. Usually I try to avoid testing various pins as it just adds up to work and same with CTA buttons, guess I have to start making efforts for the same. Thanks for sharing these tips.
Glad you found them useful.
Hi,
you have helped me with your well-written article. I wish to thank you for spending time researching the mistakes we usually make and explained them perfectly. I found useful. thank you
You’re very welcome. I’m glad I could help.
Pretty detailed tips Priya, have read many blog posts on pinterest marketing but the tips here are really useful especially for who are starting new on pinterest.
Thanks
Thanks, Heeren.
Thanks for the great article.
Can you explain this a little further?
data-pin-id=”YOUR PIN ID AFTER IT IS PINNED TO PINTEREST” />
What is the data pin?
Thank you for your feedback, Bibi. I will add some more information to the article to help you understand that. Please bookmark it and check back in a while.